The Best M.2 Enclosures with Great Peformance Series!
RPiBOX India M.2 Enclosure series:
Scope:
This document – will cover the following:
Product Series
Compatibility
Troubleshooting
Installation – [Refer individual product page]
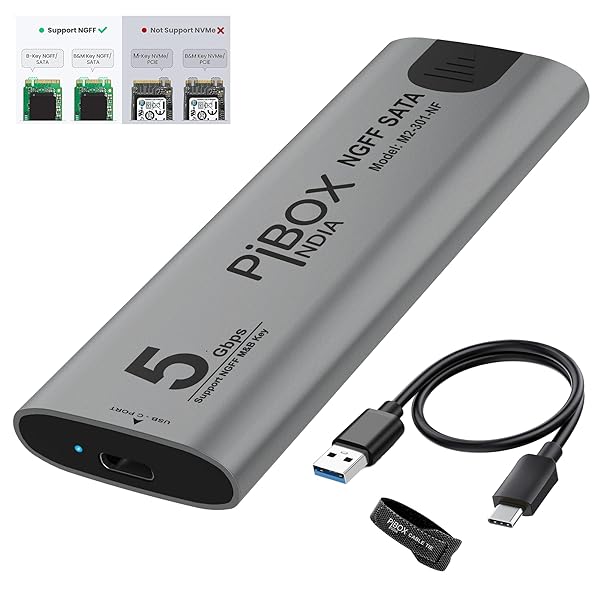
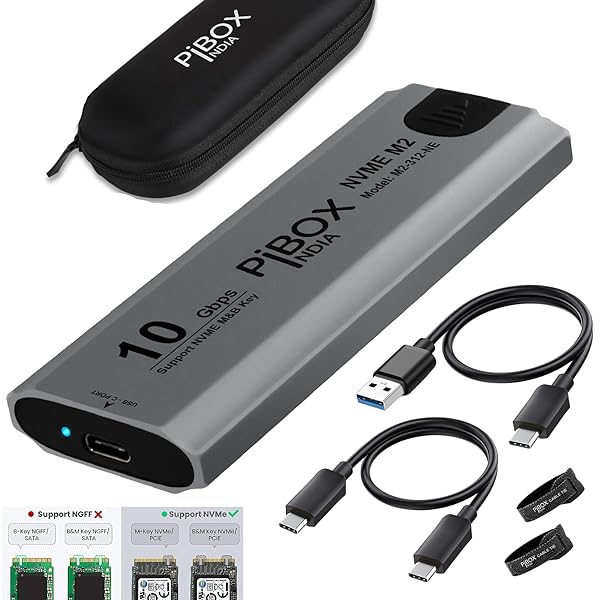
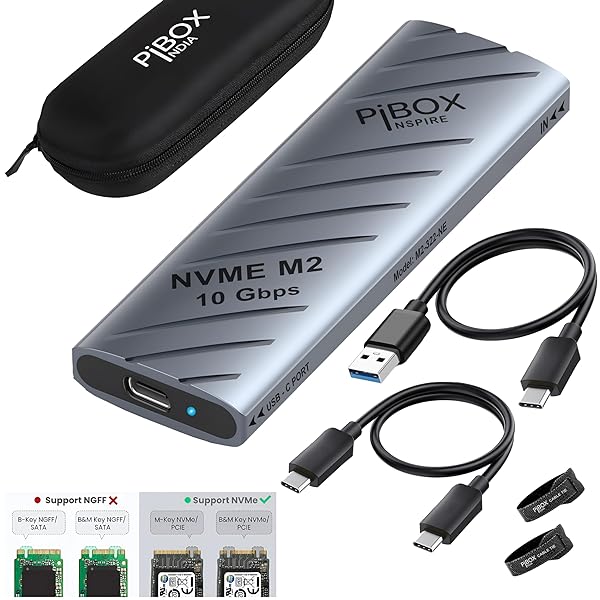
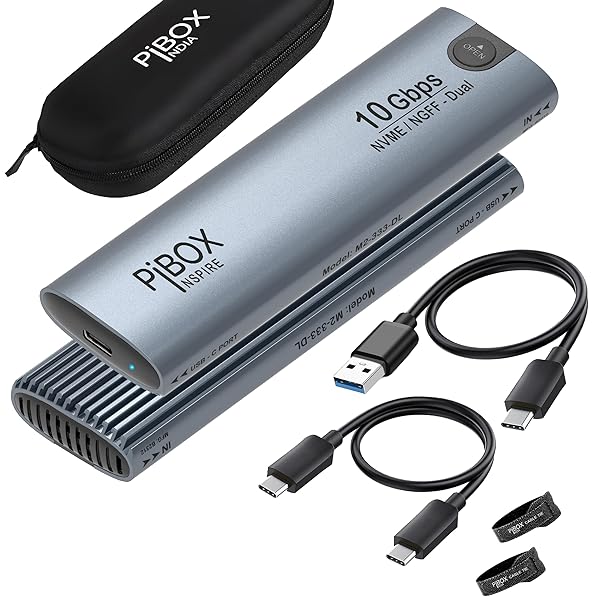
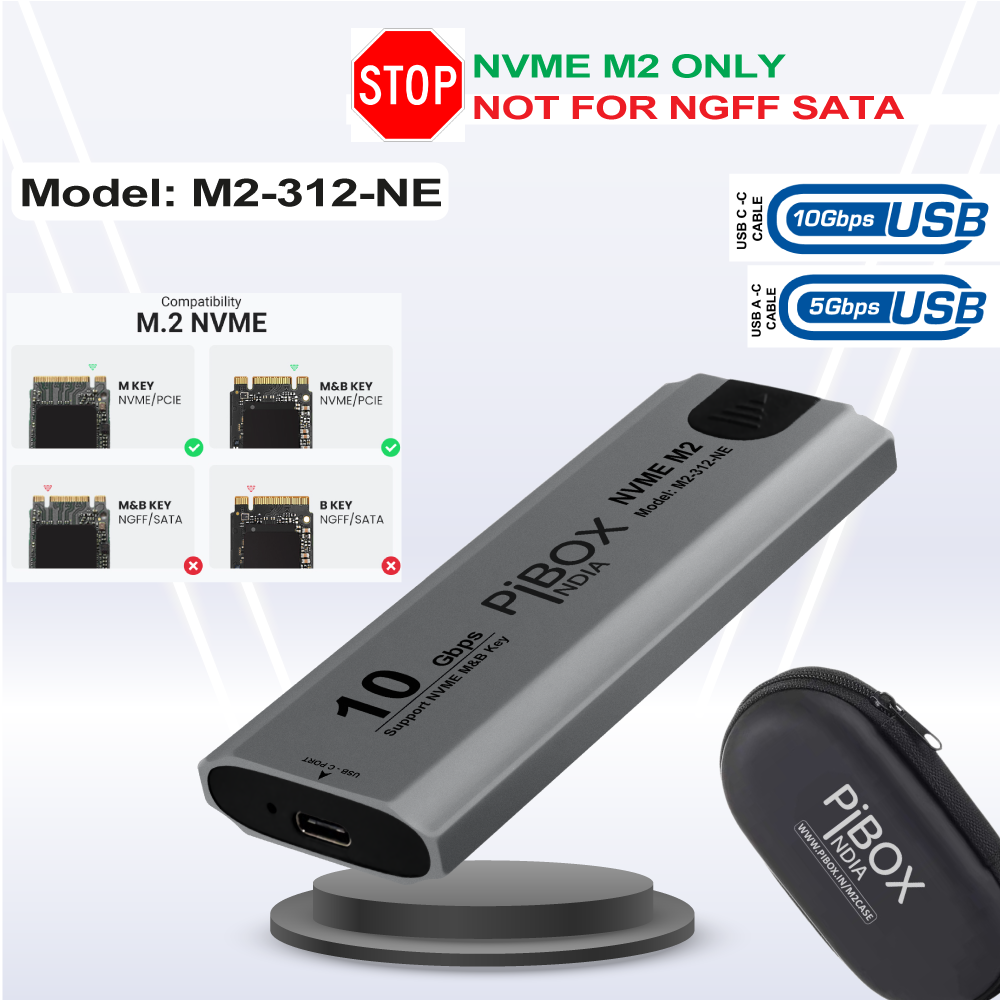
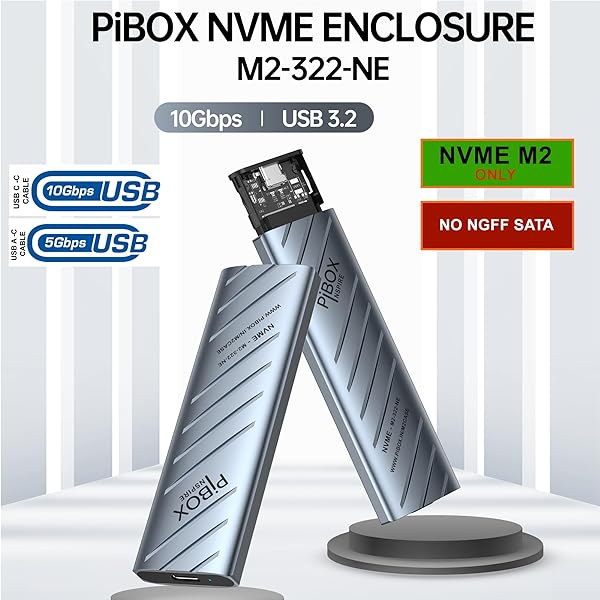
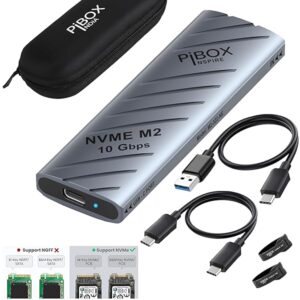
PiBOX India supports SATA III M.2 SSD , PCIe® Gen3 NVME and PCIe® Gen4 NVME depending on the model.
M.2 is a solid-state drive (SSD) form factor introduced in 2013. It’s smaller than standard 2.5-inch SSDs. The “M” stands for module, and the “2” denotes it as the second version. M.2 SSDs come in two types: SATA and NVMe.
When we began this product series of M.2 Enclosures, our goals are straightforward:
Keep prices at true value without sacrificing quality..
Prioritize quality, even if it means delaying our product launches. For instance, we could have introduced NVMe enclosures at higher prices earlier, but we chose to wait until prices aligned with affordability.
We promise that we will keep innovating while keeping the prices at true Value ! We intend to achieve this by increasing the Sales Volume and build trust!
Expand below topics for Detailed information – Press∨ below
We understand the variety of M.2 SSD variants can be overwhelming. Our effort is to simplify the process, making it easy to determine the right enclosure for your needs.
Press Windows + X and choose “Disk Management” from the context menu.
Or, type “Disk Management” in the Windows search bar and select the “Create and format hard disk partitions” option.
View Disks and Partitions:
In Disk Management, you’ll see a list of all the connected drives, both internal and external. The graphical representation of the drives and their partitions is displayed in the lower section.
Initialize a New Disk:
If you’re using a new, unformatted disk, you may need to initialize it. Right-click on the disk in the lower section and choose “Initialize Disk.” Follow the on-screen prompts to select the partition style (MBR or GPT).
Partitioning:
Create a New Partition:
To create a new partition on an unallocated space, right-click on it and select “New Simple Volume.” Follow the wizard to set the partition size, drive letter, and file system (usually NTFS).
Format the Partition: [In case of new disks only]
After creating a new partition or using an existing one, you need to format it. Right-click on the partition and select “Format.” Choose the file system (typically NTFS), set a volume label, and perform a quick format (or full format if required).
Change / Assign Drive Letters:
You can change the drive letter of a partition by right-clicking on it and selecting “Change Drive Letter and Paths.” Follow the prompts to assign a new drive letter.
Here are the instructions for troubleshooting a PiBOX India NVMe SSD enclosure:
Disconnect the PiBOX India enclosure from the USB-C end of the cable.
Remove the NVMe SSD from the PiBOX India enclosure and set it aside for now.
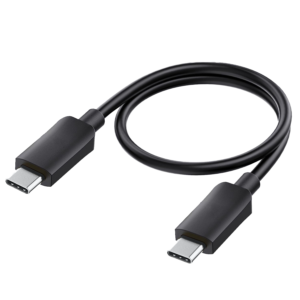
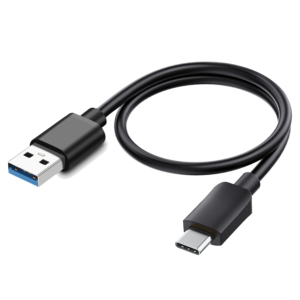
Connect one of the two provided USB cables to the computer. If using the USB-A to USB-C cable, ensure the USB-A end is fully seated in the computer’s USB-A port.
Open the Device Manager by right-clicking on the Start Menu and selecting “Device Manager” from the pop-up menu.
Expand the section labeled “Disk drives” and keep an eye on this section during the following steps.
Connect the empty PiBOX India enclosure to the USB-C cable end connected to the computer. Watch for the PiBOX India enclosure to be detected in the Device Manager’s “Disk drives” section, typically listed as “RTL9210.” 6a. Also, check to ensure that the blue power LED on the PiBOX India enclosure is illuminated after connecting it to the computer.
Assuming the PiBOX India enclosure is detected, disconnect it from the computer, and let it sit for 15-30 seconds.
Install the NVMe SSD into the PiBOX India enclosure.
Reconnect the PiBOX India enclosure to the computer and check for the SSD entry to show up in the Device Manager’s “Disk drives” section.
Please let me know if the SSD is detected in the Device Manager, and we can proceed from there with your PiBOX India enclosure.
M.2 is the physical form factor. SATA and PCIe refer to the storage interface, the primary difference is performance and protocol. The M.2 spec was designed to accommodate both a SATA and PCIe interface for SSDs. M.2 SATA SSDs will use the same controller currently on typical 2.5 in SATA SSDs. M.2 PCIe SSDs will use a controller specifically designed to support the PCIe protocol.
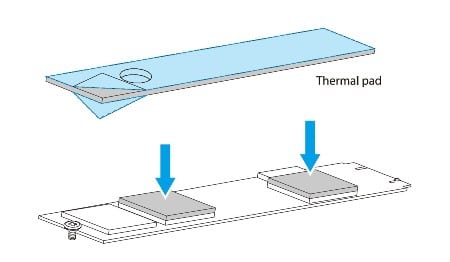
Take the M.2 NVMe enclosure and thermal pad. Clean the area where you will put the thermal pad.
1. First, take the M.2 NVMe drive and properly insert it into the slot of the enclosure. Secure it tightly as per the enclosure instructions
2. Remove the protective film covering from the thermal pad [ both sides] as shown on photo
Then place the thermal pad firmly on the area meant for it on top of the NVME SSD.
• Now put the M.2 NVMe drive inside the enclosure slot properly. Make sure it is fitting tightly.
Note:- It may be tight to close the enclosure with the thermal pad. This is done to create higher point of contact for better heat dissipation. Thermal pad a functional item and it works if you create contact with the metal.
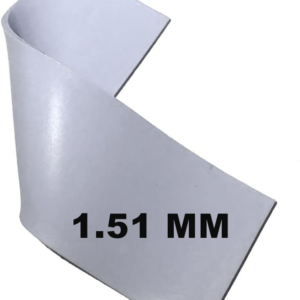
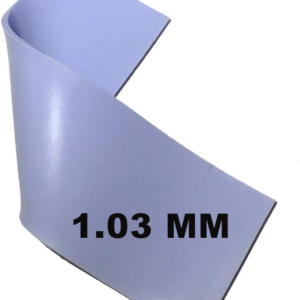
For the larger 2 mm thermal pads – You may need to shave additional area – depending on your disk thickness.. All disks are of different thickness.
Summary: Thermal pad is not a cosmetic item and its a functional item. The more tight it is the better will be the heat transfer.
Below are the steps that can be performed to improve speeds of your disk:
First step: Check if your disk is TLC based or value driven QLC DRAMless disk. There wil be a big difference in performance between TLC / QLC based disks when used externally. [Search online also]
Disable Write Cache: Go to “Device Manager → Disk Drives → Right-click on the NVMe drive → Properties → Policies → Uncheck ‘Enable write caching on the device'”
For DRAMless NVMe disks, disabling write cache can significantly improve write performance by reducing the need for the drive to manage its own caching and reduce wear on the NAND flash memory.
Note: This step is not needed for TLC (Triple-Level Cell) based NVMe disks, as they typically have sufficient built-in caching capabilities.
Use the Backside Motherboard Port: On desktop PCs, use the NVMe slot or port on the backside of the motherboard. These ports often have dedicated lanes and are less likely to experience bottlenecks compared to front-side ports shared with other components.
If Thermal Throttling Occurs:
Use a Cooling Fan or Heatsink: Proper cooling can prevent thermal throttling, which reduces performance to prevent overheating.
Utilize a USB-C 5Gbps Cable: If thermal throttling persists, use a USB-C cable with a maximum transfer rate of 5Gbps. This can help regulate the speed and prevent the enclosure from overheating.
Enable TRIM Support: Enabling TRIM support can improve write speeds by allowing the NVMe drive to manage and reclaim unused blocks more efficiently. [See the other line item for the detailed steps]
Optimize System Settings: Adjust system settings, such as disabling power-saving modes, enabling AHCI or NVMe drivers, and allocating sufficient resources to the storage controller, to maximize NVMe performance.
Our USBC-NVME external enclosure can be used as the destination for many full featured retail or open source cloning tools, as long as the tool is compatible with USB storage it should work just fine.
Some SSDs include proprietary or limited capability cloning software. For example Samsung includes the Samsung Data Migration software and Crucial includes a limited version of the Acronis True Image software.
Unfortunately the manufacturer’s SSD firmware updating and monitoring utilities are unlikely to be compatible with the NVMe SSD connected to the computer over USB. These utilities are designed to communicate with the NVMe SSD on a PCI Express interface and are not designed to be compatible with USB, it is possible this functional can be added by the SSD manufacturer, however with the risk of unexpected disconnections it is unlikely this will be added by most manufacturers.
Yes! The PiBOX USBC-NVME enclosure does support Trim with compatible operating systems and files systems.
For Windows, Trim support was initially added with Windows 7 for SATA SSDs, however support for USB Trim was not added until Windows 8 with the UAS (USB Attached SCSI) Protocol. Trim is supported on Microsoft’s ReFS and NTFS file systems.
Windows 10 enables Trim for both internal and USB connected SSDs with supported host controllers, devices, and file systems. Windows 10 supports Trim on USB storage devices that support UASP (USB Attached SCSI Protocol) and with either NTFS or ReFS file systems. Some early USB 3 host controllers may not support UASP or Trim correctly.
To check if Trim is enabled in Windows 10 please try the following:
Launch Windows PowerShell with Administrative Permissions ( Right-click on the Start Menu and select “Windows PowerShell (Admin)”
Allow the application to run as administrator through Windows User Account Control
Type in the following command to check the value for DisableDeleteNotify
fsutil behavior query DisableDeleteNotify
If DisableDeleteNotify is set to 1, we can enable Trim with the following command
fsutil behavior set DisableDeleteNotify 0
To manually run Trim or to modify the automatic schedule:
Open the Windows 10 Start Menu and type “optimize” into the search box
Select “Defragment and Optimize Drives” app from the search results
The Optimize Drives window shows connected drives that can be optimized
Select the USB connected SSD from the list and then press the “Optimize” button to manually start trim
Use the “Change settings” button to adjust or schedule Trim on the drive
Alternatively Trim can be run manually from the command line:
Launch Windows PowerShell with Administrative Permissions ( Right-click on the Start Menu and select “Windows PowerShell (Admin)”
Allow the application to run as administrator through Windows User Account Control
Type in the following command, where X: is the drive letter of the external device to run Trim at the command prompt
defrag /o X:
For macOS, Trim support was initially added with macOS 10.6.8, however Trim support was limited to Apple branded SSDs. As of macOS 10.10.4 the trimforce terminal command was added to support Trim on 3rd party SSDs. Some users have reported success with Trim on our USBC-NVME enclosure while others have reported the command failed to execute correctly. Apple’s HFS+ and APFS file systems both support Trim.
For Linux, Trim support was added with kernel 2.6.28 and is compatible with a variety of file systems, default Trim behavior is dependent on the specific Linux distribution and version.
Apple macOS enables Trim for internal Apple SSDs only. Advanced users can also enable Trim for USB connected SSDs with Apple APFS formatted partitions. Apple macOS runs Trim when the file system is detected by the operating system, this is either on device connection or system restart, Apple does not provide a manual Trim tool like with Windows or Linux.
Enabling Trim in macOS
Open a terminal (Finder > Go > Utilities > Terminal) and enter the following command:
sudo trimforce --enable
This requires administrative permissions to run and you will need to enter your password to continue.
A long warning will be presented, please read this fully.
Enter ‘Y’ to continue, or ‘N’ to cancel
Trim can be disabled with the following command:
sudo trimforce --disable
Verifying Trim on macOS
Apple macOS does not have a function to manually run a Trim command, instead it is run when a supported drive and supported file system is detected by the operating system. We can check to verify Trim is running on a drive by performing the following:
Open a terminal (Finder > Go > Utilities > Terminal) and enter the following command:
log show --start $(date +%F) | grep -i spaceman_trim_free_blocks
This may take a moment to complete, I recommend expanding the window to full screen for easier reading.
Each output line represents a file system that has been trimmed on today’s date, here is an example line:
New hard drives and SSDs, including NVMe SSDs, need to be partitioned and formatted before the first use. Windows will not prompt to format a blank drive when connected.
Start by installing the hard drive or SSD (referred to as “drive”) into the PiBOX hard drive dock or drive enclosure and connect it to the computer using the provided cables and power supply if applicable.
With the drive connected to the computer, we can create a partition table, and at least one partition, then format the partition.
Right-click on the start menu and select Disk management from the pop-up menu
If this is a new, blank drive, the system will prompt to initialize the drive by writing a partition table to the drive with the Initialize Disk dialog
Uninitialized drives are listed under the Select disks: section, check all that apply
For drives over 2TB GPT is required to access the full storage capability of the drive, we also recommend GPT for SSDs and drives used with other Windows 10 systems, MBR can be used for drives that need to be used with legacy Operating Systems, for example Windows XP
Select OK to continue
The drive currently has no partitions, right-click on the Unallocated space and select New Simple Volume… from the drop-down menu to start the New Simple Volume Wizard
At the introductory screen, select Next to continue
At the Specify Volume Size screen, select Next to continue with the default value
At the Assign Drive Letter or Path screen, select Next to use the default values, this will assign the next available drive letter to the new partition
At the Format Partition screen, select the File system from the drop down menu, NTFS is the default and works well with Windows computers, exFAT is also compatible with macOS and Linux*. A Volume label can also be entered on this screen, this is the name of the drive. We recommend leaving the other options at the default values, Quick Format should be checked
Select Finish to start the formatting, it should complete within a few seconds to a minute depending on the drive
4. The drive should now be accessible within Windows explorer under My Computer
MACOS:
New hard drives and SSDs, including NVMe SSDs, need to be partitioned and formatted before the first use. macOS will normally prompt you when a blank drive is connected with the option to Initialize the drive.
Start by installing the hard drive or SSD (referred to as “drive”) into the Plugable hard drive dock or drive enclosure and connect it to the computer using the provided cables and power supply if applicable. macOS will normally prompt you when a blank drive is connected with the option to Initialize the drive.
Either select the Initialize button on the prompt, or select Go > Utilities > Disk Utility, either option will open the Disk Utility
Select the external drive in the left column, then the Erase button to start the formatting process, please be sure this is the correct drive before formatting
The Erase Drive dialog drop down lets us name the drive and select the file system format from a list, the defaults are recommended
Select the Erase button to format the drive, this will take between a couple of seconds to minutes depending on the drive
The newly formatted drive can be used as a Time Machine backup, or used as a standard storage drive
There are 3 key formats for M.2 SSD drives. B, M and B+M.
An M.2 SSD with the B-key edge connector may support SATA and/or PCIe protocol depending on your device, but can only support up to x2 performance on the PCIe bus.
An M.2 SSD with the M-key edge connector may support SATA and/or PCIe protocol depending on your device, and can support up to x4 performance on the PCIe bus. This is provided that the host system also supports x4.
An M.2 SSD with the B+M-key edge connector may support SATA and/or PCIe protocol depending on your device, but can only support up to x2 performance on the PCIe bus.
Yes! Our USBC-NVME enclosure does support SMART data.
Access to SMART data is software dependent, we have tested our enclosures with smartmontools, a free, cross platform SMART reading and monitoring utility. The command line utility smartctl is the primary method for accessing the SMART data.
JMicron Units:
For our original JMicron enclosures the SMART data can be read using the “-d sntjmicron” argument at the command line, for example:
smartctl -a -d sntjmicron /dev/sdb
Realtek Chipset units:
Our USBC-NVME enclosures with Realtek RTL9210 chipset use a similar “-d sntrealtek” argument, however this will be automatically detected in future version of smartmontools.
smartctl -a -d sntrealtek /dev/sdb
[Refer chipset model on the main page version to know more]
Windows:
Modern hard drives and solid state drives include support for Self-Monitoring, Analysis, and Reporting Technology or SMART. SMART data can show signs of drive failure or wear before data loss occurs and can be used to monitor the health of the drive including the temperature sensors in the drive itself.
From the Crystal Disk Info Graphical Utility
Crystal Disk Info can be downloaded from here, this is a 3rd party utility for viewing a drive’s SMART data in windows. This can be run without installation by downloading and extracting the ZIP file, or installed like many other applications.
After extracting the zip file, right-click on “DiskInfo64.exe” and select “Run as Administrator” to start the application with Administrative permissions required to read the SMART data from the drive.
From the Command Line with smartctl
The smartctl command is provided in the smartmontools suite. This can be downloaded and installed for Windows or Linux.
Installation and Running
After downloading the smartmontools-7.2-1.win32-setup.exe, right-click on the file and select “Run as Administrator” to start the installation. Follow the on screen steps to install smartmontools.
Open a terminal, right-click on the start menu and select “Windows PowerShell (Admin)” from the pop-up menu
Type in `smartctl –scan` to list the available drives
To output all of the drive’s SMART data, type in `smartctl –all /dev/sdn` where /dev/sdn is the first column from the scan output for the drive to be read
Optionally, output this to a file the desktop using the following: `smartctl –all /dev/sdn > $env:USERPROFILEDesktopsmartdata.txt
If you receive an error “Open failed, Error=5” most likely the Windows PowerShell was not run as Administrator.
A: A PiBOX India NVMe M.2 Enclosure is an external housing that allows you to connect a PiBOX India M.2 NVMe SSD to your computer or other devices via a USB connection. It effectively turns your PiBOX India M.2 NVMe SSD into a portable and external storage solution.
Q: Are PiBOX India NVMe M.2 Enclosures compatible with all M.2 SSDs?
A: Most PiBOX India NVMe M.2 Enclosures are compatible with standard M.2 NVMe SSDs. However, it’s essential to check the specific size and key type (e.g., M-key, B-key, or B+M-key) of your SSD to ensure compatibility with the PiBOX India enclosure.
Q: Will an M.2 SATA SSD work if installed it in a NVME Enclosure or vice versa ?
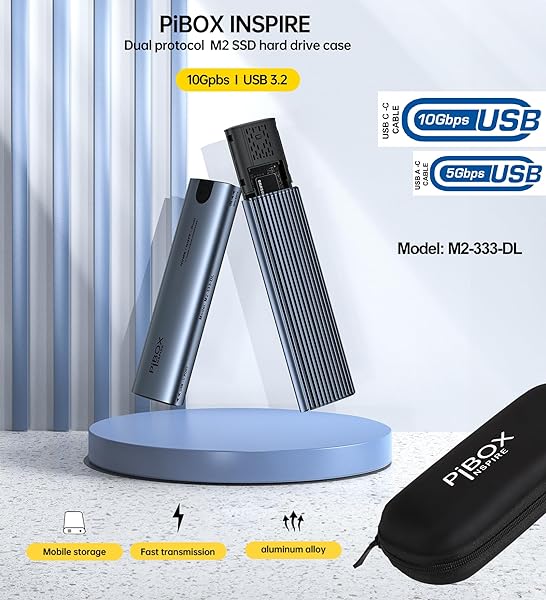
The Dual protocol Enclosures will support both NVME and NGFF models. [Refer Compatibility check]
Note: The NGFF B – Key will only work on the NGFF Single protocol enclosures because of the physical design limitation as there is no grove on the B key NGFF.
Why are M.2 NVME faster than M.2 SATA ?
M2 SSDs use the SATA interface while M2 NVMEs use the PCIe interface. This means that M2 NVMEs are faster than M2 SSDs.
Q: What kind of speed can I expect with a PiBOX India NVMe M.2 Enclosure?
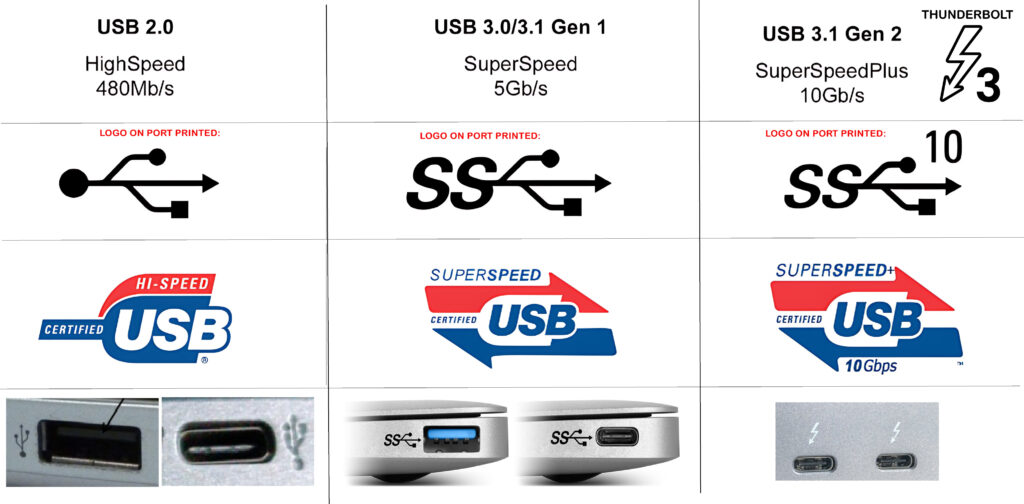
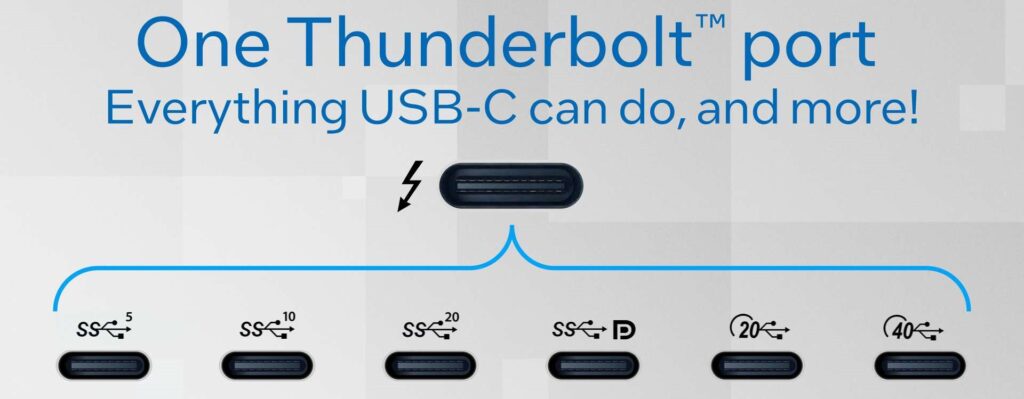
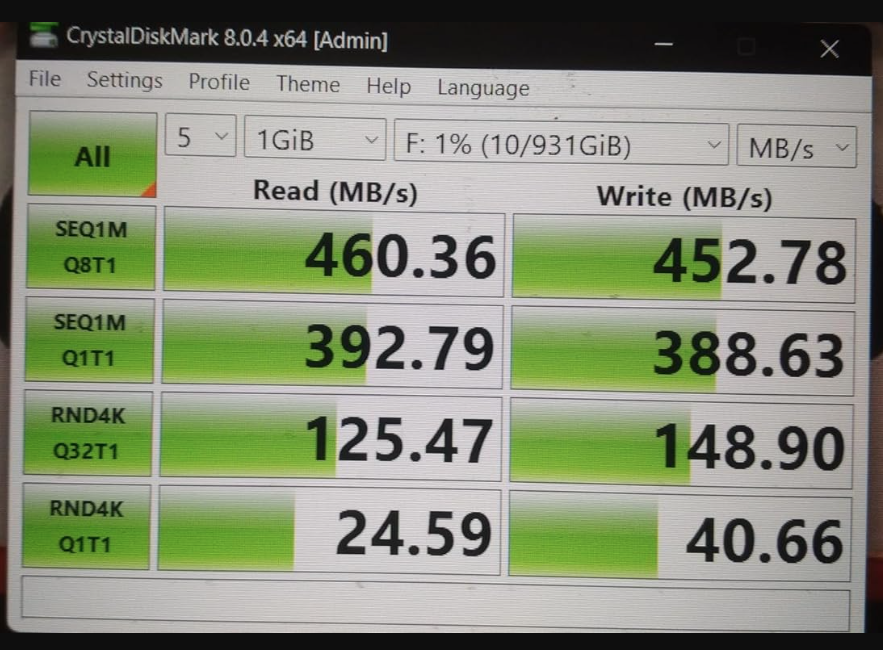
A: The speed of your PiBOX India NVMe M.2 Enclosure depends on the USB interface it uses. If it’s a PiBOX India USB 3.1 Gen 2 or Thunderbolt 3 enclosure, you can expect near-native PiBOX India NVMe SSD speeds, which can be extremely fast. If it uses USB 3.0, the speeds may be somewhat lower but still significantly faster than traditional hard drives.
Thunderbolt Port: The speeds expected are about 900 – 1000 MB/S (or about 8 – 9 Gbps) if connected to a thunderbolt port.
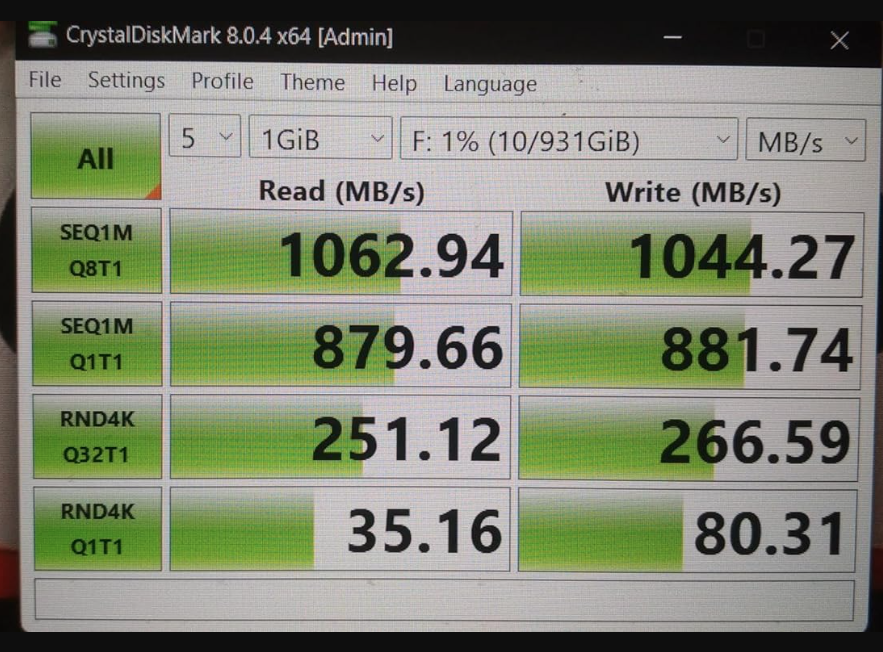
Super Speed -SS Port USB C: If connected to a superspeed port – We will get approx 450 MB/S or 4-5 Gbps. (This is USB speed limitation)
Q: How do I install a PiBOX India M.2 SSD into the enclosure?
A: Installing a PiBOX India M.2 SSD into the PiBOX India enclosure typically involves opening the enclosure, aligning the PiBOX India SSD with the connector, and securing it in place. Specific installation instructions can vary between PiBOX India enclosure models, so refer to the PiBOX India enclosure’s manual for detailed guidance.
Q:Can I use a PiBOX India NVMe M.2 Enclosure with my gaming console or tablet?
A: It depends on the compatibility of your gaming console or tablet with external storage devices. Some gaming consoles, like the PlayStation 5 and Xbox Series X, may support PiBOX India NVMe M.2 Enclosures for expanding storage. Check your device’s specifications and manufacturer guidelines for compatibility.
Q: Do I need any additional drivers or software to use a PiBOX India NVMe M.2 Enclosure?
A: In most cases, PiBOX India NVMe M.2 Enclosures are plug-and-play and don’t require additional drivers. Your computer or device should automatically detect and install the necessary drivers. However, it’s a good practice to check for firmware updates for the PiBOX India enclosure to ensure optimal performance.
Q:Can I boot my computer from an OS installed on a PiBOX India NVMe M.2 SSD inside an enclosure?
A: It’s possible to boot your computer from an OS installed on a PiBOX India NVMe M.2 SSD within a PiBOX India enclosure, but this capability depends on your computer’s BIOS/UEFI and operating system. Make sure your system supports booting from external drives and configure the BIOS/UEFI settings accordingly.
Please refer the specific documentation that comes with your PiBOX India NVMe M.2 Enclosure for model-specific information and instructions.


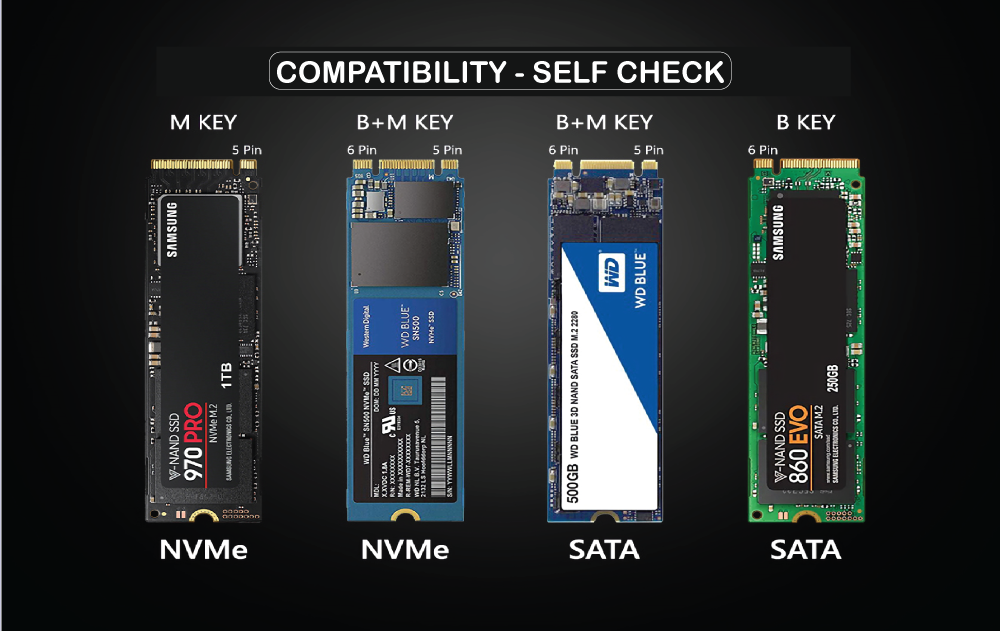


The self check portion on the page is very helpful… I did not actually realize that there are variations on these disks. Hope you guys are successful!
Hi
Bought two recently. Great, works superbly
Cheers